GUARD DOG SETUP INSTRUCTIONS
GUARD DOG TENSION STRING INSTRUCTIONS:
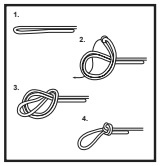
STEP 1. ON ONE END OF THE STRING TIE AN OVERHAND LOOP KNOT, (SIMILAR TO TYING A KNOT ON A BALLON), WITH AN APROXIMATELY 2 TO 3 INCH FINISHED LOOP SIZE. (MAKE SURE THE KNOT IS TIGHT AND SECURE AFTER TYING).

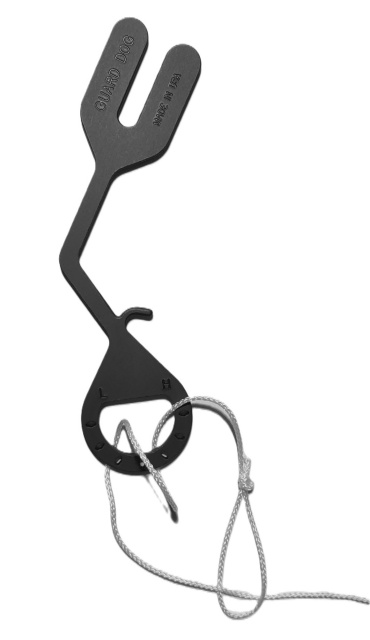
STEP 2. RUN THE "TIED LOOP END" OF THE STRING UP THROUGH THE OPEN AREA OF THE GUARD DOG BODY "TWICE". RUN THE OPPOSITE END OF THE TENSION STRING, (THE UNTIED END OF STRING), THROUGH THE TIED LOOP. PULL THE UNTIED END OF THE STRING COMPLETELY THROUGH THE LOOP UNTIL THE TENSION STRING ATTATCHES TO THE GUARD DOG BODY SECURELY.

STEP 3. RUN THE UNTIED END OF THE TENSION STRING UP THROUGH AN OUTSIDE HOLE IN THE TENSION ADJUSTER (THE PLASTIC PART WITH 3 HOLES IN IT). THEN RUN THE STRING DOWN THROUGH THE CENTER HOLE IN THE TENSION ADJUSTER. PULL THE STRING THROUGH UNTIL YOU HAVE APPROXIMATELY A FOOT OF EXCESS STRING GOING THROUGH THE CENTER HOLE. NOW TIE THE END OF THE TENSION STRING ONTO THE OPEN OUTSIDE HOLE AND MAKE SURE THE KNOT IS SECURE.
PLEASE NOTE: A "How to tie your tension string and attach it to your Guard Dog" video is shown at the bottom of this page for your viewing.
GUARD DOG USER INSTRUCTIONS:
NOTE: The Guard Dog will work on most fishing rods, but the rod tip eye must be large enough to allow the Guard Dog nose to release freely. Some micro rod tip eyes may prevent the Guard Dog from releasing the rod tip properly. Please check your rod tip eye to be sure that your rod tip eye will provide enough clearance room for the Guard Dog to swing freely in and out of the eye without binding. Guard Dog Inc will not be responsible for any damage caused by using too small of a fishing rod tip eye.
STEP 1 – Cast out bait, reel in most of slack, and place fishing rod in a rod holder in a "mostly upright position". NO MATTER WHAT TYPE OF FISHING REEL YOU ARE USING... ALWAYS PLACE YOUR FISHING ROD IN A SPINNING ROD POSITION, (WITH THE ROD EYES FACING TOWARDS THE WATER).
STEP 2 – Attach the bottom part of the tension string, (tension line loop opposite end of the Guard Dog), onto a rod holder, rod holder ground stake, tent ground stake placed just in front of rod holder, or attach it to a rod holder on a boat.
STEP 3 - Adjust the tension string length with the adjustable string tensioner so the Guard Dog is originally set at approximately 6 inches below the rod tip.
STEP 4 - Stand to one side of the fishing rod. With your Guard Dog in one hand, slowly bend the fishing rod tip down, and with the other hand place the small, “curved nose” of the Guard Dog into the eye of the rod tip with the small, curved nose on the Guard Dog facing in towards the fishing rod.
STEP 5 – Slowly raise the fishing rod tip until the Guard Dog is firmly held in place by the small, curved nose by the attached tension string.
STEP 6 – If your rod tension needs adjusted, hold onto the Guard Dog firmly while adjusting the string tensioner to your desired rod tension. WARNING: DO NOT OVER BEND YOUR ROD TIP, AS THIS COULD CAUSE DAMAGE TO YOUR FISHING ROD! ADJUST THE TENSION STRING ADJUSTER SO THE ROD BEND DOES NOT EXCEED OVER 1/2 OF YOUR ROD’S MAXIMUM BEND!
STEP 7 – Place your slack fishing line into fishing line holder slot.
STEP 8 – You can now set trigger setting from light to heavy, (and anywhere in between), by sliding the attached string on the Guard Dog, (sliding the attached string towards the water will create a lighter strike setting, sliding it towards the pole will create a heavier setting). DO NOT SET THE ADJUSTABLE TRIGGER TOO LIGHT AS THIS COULD ACCIDENTLY CAUSE THE ROD TIP TO SWING LOOSE FROM THE GUARD DOG AND CAUSE A POSSIBLE INJURY.
* NOTE: Setup Instructional video can be viewed below